I usually carve smaller spoons like pocket spoons or regular eating spoons, but when I ask a friend or family member what they would like me to carve for them - more often than not they want a cooking spoon.
-
All in all it makes no difference to me time wise. For me it seems to take as much time to cave a little pocket spoon as it does to carve a bigger cooking spoon.
-
Here I have a big slab of sugar maple wood:
-
All in all it makes no difference to me time wise. For me it seems to take as much time to cave a little pocket spoon as it does to carve a bigger cooking spoon.
-
Here I have a big slab of sugar maple wood:
-

-
It happened to be on the side of the road when one of my neighbors was pruning a maple tree before winter. There was a lot that they allowed me to take so I had to process as much as I could and store it all in the freezer.
-
I dug this block of the freezer and let it thaw. It was ugly and discoloured on the surface but as soon as I dug into it I could see the lovely grain of sugar maple that I know and love.
-
This slab has a natural curvature to it since the branch was bent. This gives a lovely shape to a spoon and good strength as well.
-
First I saw a stop cut for the crank:
-

-
This is so that I can establish a crank (curvature in a spoon bowl), more specifically I can chop down the wood with my axe to smooth out the surface. The stop cut is so that I cannot chop past it, I then have to switch to the other side and come at it from another angle.
-

-
This is so that I can establish a crank (curvature in a spoon bowl), more specifically I can chop down the wood with my axe to smooth out the surface. The stop cut is so that I cannot chop past it, I then have to switch to the other side and come at it from another angle.
-

-

-
After this I can start to draw my template, usually a cross across the crank line and then a center line which follows the wood grain while keeping in the center of the blank as much as possible.
-

-
I usually free hand the general shape of the spoon and adjust as I go.
-

-
Next I start to chop into the neck, I will support the neck of the spoon on the side of my chopping block for this. I will have to control my axe chops and have them meet where I stopped on the handle.
-
After some stop cuts on either side of the spoon I chop down the handle and begin to establish the shape of both sides of it.
-

-
It will happen often that in my axe carving process, I chop over the line I had drawn.
-

-
This is where I will need to stop, grab a marker and readjust the shape.
-

-
At this point I finish cleaning up the back profile of the spoon. What I will do is, thin out both sides of the back of the handle leaving a ridge in the middle. I then will chop straight down always coming from bowl to end of handle. I chop down from where the bowl crank begins and I do the same when I flip it around.
-

-
Now to bring the saw back and saw off the extra material. When using a saw like this, its important to apply some pressure on the pull stroke. The forward stroke does not cut as well and I used to forget this as a new carver. It makes the sawing process so much more relaxing to just let the saw do the work for you.
-

-

-
Having a saw like this is great for the sake of convenience and quickness but it is not entirely necessary.
-
After this I use the axe to thin it down wherever necessary and get as close to the template outline as possible. I want to get it as close as possible to a spoon before taking my knife to it, this just saves my hands the extra work. I used to leave a bunch of bulk material which I then would have to spend a very long time chipping and slicing away at.
-
Taking the time to axe out a blank properly has greatly improved my carving skills.
-

-

-
Its time for knife work:
-

-
Down the sides first as close as possible to where the bowl meets the neck. I need to be mindful of where the grain stops, there is a spot where the grain meets and this is the trickiest kind of spot to carve. You have to be careful not to go too deep as it can be difficult to get the grain to match. If having any trouble just get as close as possible, wait until the spoon is completely dry, and then make sure your knife is as sharp as possible. You will have to just use the very tip.
-

-
Next step, I carve the angle sloping down the bowl, away from the crank and towards the handle of the spoon - as shown in the picture:
-

-
Then, carve the rest of the back profile. Just generally keeping it smooth and even. Getting it as thin as what strength the spoon needs.
-
Eating spoons can be very thin as they are not intended for heavy work whereas a cooking spoon will be used to stir heavy foot and frequently tapped against the sides of pots and pans. So keeping a cooking spoon thicker will ensure it lasts longer.
-

-
Next will be the front of the handle and then I will round off the sides, to make it pleasant to hold onto.
-

-
Onto the bowl which requires the use of a hook knife, I will do a sweeping motion across the grain. I used to brace the spoon and allow the hook to hit my thumb, this caused me to have more than a few cuts which could have been easily avoided.
-
If you hold your thumb below the swipe of the knife it will travel over your skin and not have any chance to harm you - see the picture below for a demonstration of this.
-

Once the bowl has been hollowed, I just check for symmetry and make any adjustments with the sharpie as needed.

-
Next is a clean up of the previous knife marks. I will now follow the grain to give the bowl a cleaner look. I will travel with the hook knife from the front of the bowl back to where the crank is which is where grain will meet. Meaning, this is the trickiest part of the bowl.
-

-
The easiest thing to do is to carve from the back of the bowl straight down the grain right to where it meets. After you have done the same from the front. You can tease back and forth until you get a clean, smooth cut up and down the grain or you can just sweep across the grain where it meets. This second option is the easier thing to do and it depends on how sharp your hook is and how cooperative the grain on the spoon is to your efforts.
-

-
After the bowl is cleaned out well enough I clean up the rim with the tip of the carving knife.
-
In my case, even though my knife was sharp I had to deal with some little random knots in the wood. This made the grain go in all kinds of unexpected directions and made it difficult for me to carve. So I had to break out a special knife.
-

-
This is called a turning Sloyd and its from Hewn & Hone, a company founded by a group of dedicated wood carvers and tool makers.
-
At this point I have carved off all of the rough spots and thinned it out as much as I dare. It is still somewhat green (as in, the wood is moist) so I let it dry overnight.
-

-

-
When I come back to this spoon the next day I apply the finishing cuts. At this point there should be no actual shaping as especially with maple, it is super tough stuff when its dry. There are only a few adjustments and finishing touches to make, mainly to the bowl. I ensure that it is visually even around the rim of the bowl as well as around the profile of the bowl.
-
Here is the spoon after all finishing cuts have been applied before burnishing:
-

-
And here it is after burnishing:
-

-
During the finishing cuts I try to think about what kind of decorations I will add to a spoon, or if I will leave it plain. I usually like to kolrose my spoons, as kolrosing spoons is something I am very passionate about.
-
I put it to a vote on my Instagram and the majority of voters preferred that I apply milk paint. There was roughly a 30% kolrose vs 70% paint decision so I did just this for my spoon, applying a smaller kolrosing design underneath a larger paint job.
-

-
I applied some of my typical floral patters which have become my go to designs I like to make. As can be seen above and below with painters tape:
-

-
I tape off the spoon to give some clean crisp lines. As I use a powdered milk paint, it can be tricky sometimes to get the right amount of water vs powder mixture. This green paint was too watery so I had to give multiple coats before I was happy with it. Although with milk paint, a washed look can give an item a nice rustic look.
-

-
Next, more tape so I can give another coat with another colour - this time black. I wanted to give it some nice stripes so I applied the tape with some spaces left.
-

-
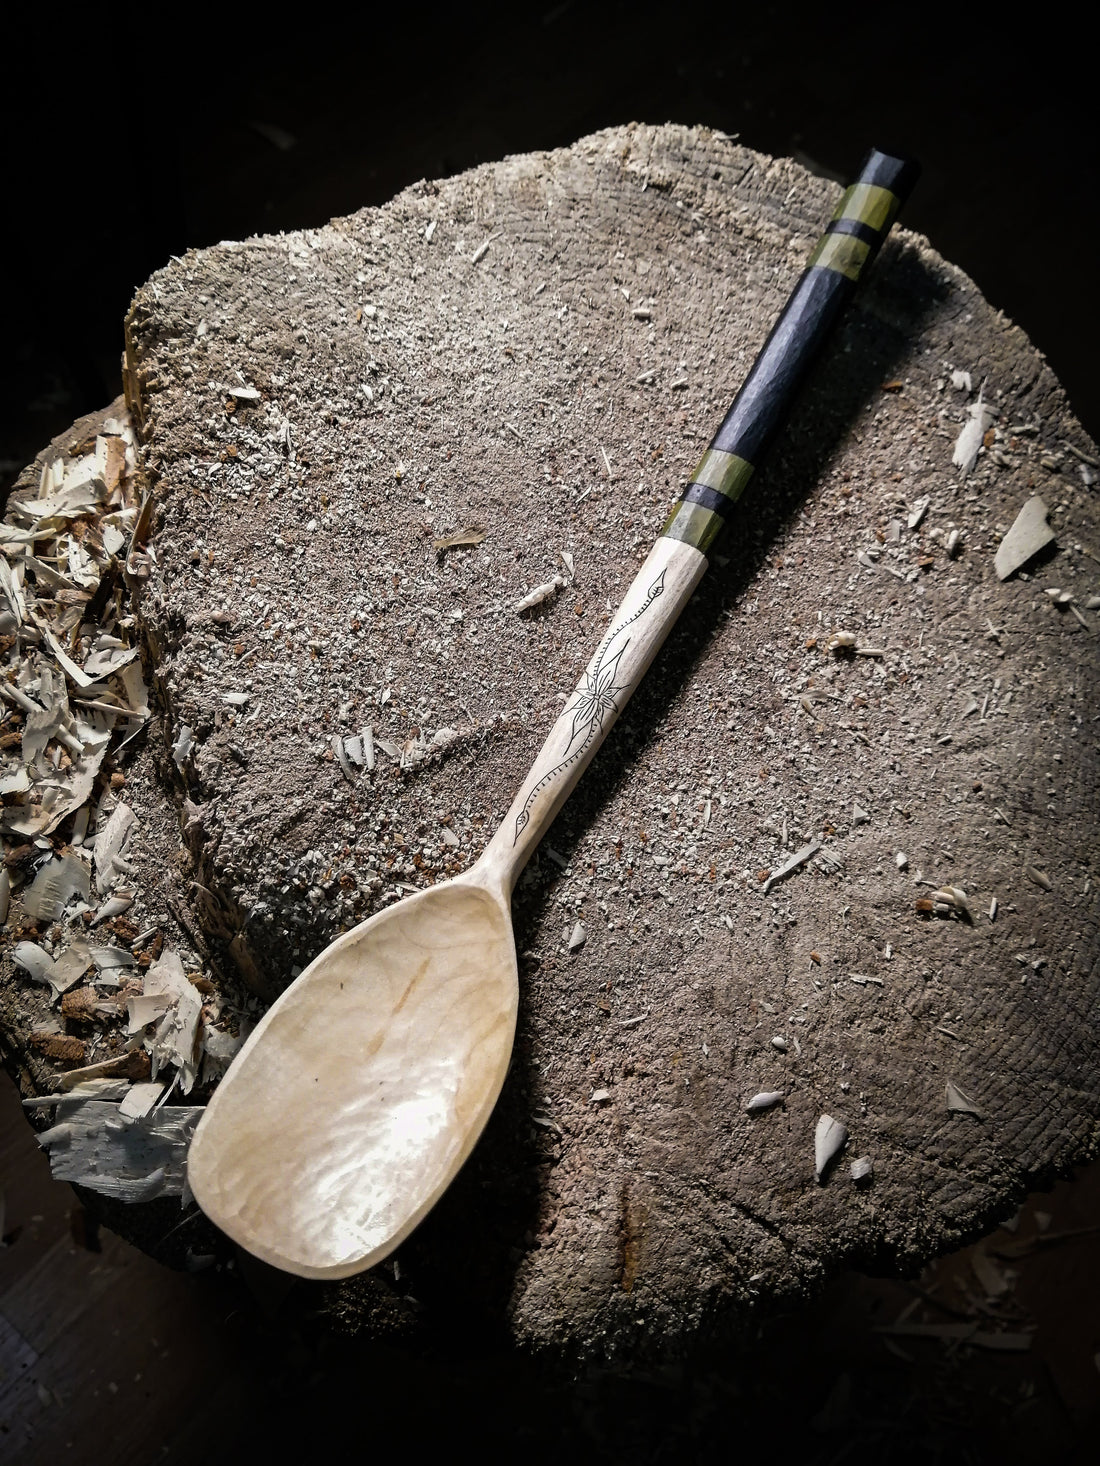
After this, all that is left to do is to peel the paint off and apply some oil (for this I used a food safe tung oil) and the pigment for the kolrosing is crushed coffee.
Now we have a finished spoon, ready to give as a gift to a friend of mine. I hope that it will serve him and his family for many countless years to come
-

-

-

-

-

-
Thanks for reading and following along on my spoon carving journey, more to come with other spoons and different projects.
1 comment
Very informative. Very nice work. A treasure for your friend. Thanks for sharing.