Kolrosing Tutorial: How to Draw a Basket Weave and Kolrose the Design on a Wooden Spoon

Kolrosing is a wood decorating technique said to originate from Scandinavia. The name is derived from coal which can be used as a pigment in the kolrosing process. This article will demonstrate in detail how to draw a basket weave pattern on paper and then onto a wooden spoon. I will then walk you through how to kolrose and finish the spoon. The materials needed for this project will also be laid out and explained.
To see all of the steps of this article explained visually, I have created a full video walkthrough available on my YouTube channel with a direct link at the bottom of this article.
The kolrosing technique can be used on a variety of wooden surfaces, and is very simple in principle. To summarize the process, the tip of a knife is used to draw a design. The knife parts the wooden fibers and a finishing oil and pigment are then rubbed with the final step being burnishing, which will close the fibers over the pigment and seal it into the design permanently.
A basket weave is an excellent first design to practice kolrosing with as it can be very simple or very complex. It is more important to master techniques such as not going over your lines and holding the knife properly than it is to master symmetry when starting out.
Tools and Materials

Wooden spoon
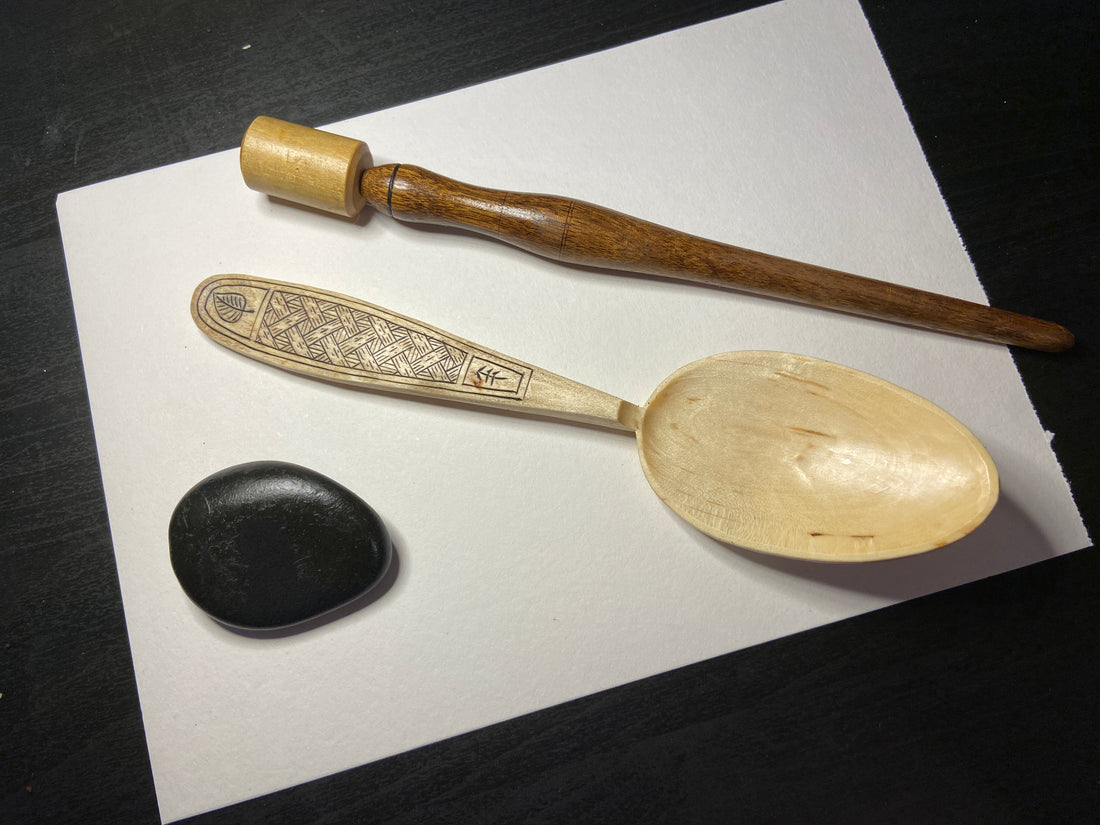
For this demonstration I am using a maple wood eating spoon which I carved. It has been burnished which leaves a dense, polished and smooth surface. Maple is ideal for kolrosing because of the typically plain white woodgrain, however many other woods such as white birch, aspen poplar, walnut, cherry, apple, among others are also excellent.
Kolrosing knife
I am using a kolrosing knife which was made by Del Stubbs of Pinewood Forge (website here). It was specifically designed for kolrosing and handles comfortably like a pen. However you do not need a kolrosing knife to make designs on wood, any sloyd knife can be used. You would just need to hold the very tip of the knife so that it’s easier to draw with. If you like, you can even tape up the bulk of the blade with painter’s tape to make it more comfortable.
Pencil and eraser
A mechanical pencil works best for me as I do not have to sharpen it and it has a very fine tip. You can of course use a finely sharpened pencil if you like. You will also need an eraser to erase the pencil marks from the wood.
Burnisher
When kolrosing a wooden spoon, burnishing is recommended before you start and especially after you finish your design, oiling, and pigment. This will close the wooden fibers over the design and lock it in permanently. I am using a decorative garden stone, the smooth round part of a carving tool will work for this as well. Whatever you use, just ensure that it is smooth and will leave no marks on your project.
Ruler
I am using a kolrosing template from The Spoon Crank (website here) which makes it easier to create a grid pattern. You can also use a bendable ruler, a business card or just draw it free-handed.
Hand towel
I use a hand towel to keep the wooden spoon protected from table scratches and scuffs. I can also use the towel to elevate a part of the spoon that I am working on and keep it stable. If I was bushcrafting, I would hold the spoon firmly in my hand and use my thigh to keep it stable.
Finishing oil
I am using tung oil from Lee Valley (website here) which is a food safe, polymerizing oil. It mixes with the pigment to create a kind of paste and goes deep into the kolrosing cuts.
Pigment
I am using finely ground coffee. I have also used cinnamon. I like coffee because it leaves a dark, bold design and is also food safe and easy to clean.
Paper towels
To clean up the mess from the spoon, your hands and surrounding area.
Piece of paper
I am using a plain white piece of paper to show you how to draw a basket weave. I drew a grid myself to show how this is done so that you can learn how to apply a grid to a spoon, but to practice various designs, you can use grid paper.
Light
Working in the sun is ideal. I use an LED light that clamps to my desk and I can angle it right above where I am working and move it around as needed.
Practicing a Basket Weave on Paper
Even if it’s not your first time, it’s good to sometimes practice what kind of design you want to make before working directly on a spoon.
You will begin by making a grid pattern on the paper. I am using a template however you can just draw freehand or to be more precise, you can measure out lines which are roughly 2 cm apart.

On the next step you will close the grid with lines going across you other ones.

The basket weave typically confuses the mind as to how it’s done when starting out. The way I map it out helps me to keep everything in place and avoid mistakes. In this style of basket weave, there will be a square of negative space in between the weaves and I will mark them with dots. The dots will be placed every other square as shown in the photo below in a 3 x 3 fashion.

And now for where the basket weaves will go, using the dots as a guide, draw lines to indicate where the rectangles will go. Each rectangle will take up three squares as shown in the photo below. The rectangles will intersect each other, always at the middle square.

The picture below shows the completed weave mapping.

On a spoon, I will have this weave diagonally as it allows for a nicer spread of the basket weave on a spoon handle. I have a recently completed spoon shown on top of the practise grid in proper orientation.

Drawing a Basket Weave on the Handle of a Wooden Spoon
Now that we know how to draw a weave, it’s time to map it out on the handle of a wooden spoon. I will begin by drawing a border around where the basket weave will go. I am doing a double border with two empty squares as shown in the example above. As a beginner, you can simply map out a rectangular area with a single border as this will be much easier. You can even have no border and bring the design to the edge of the handle if you like.

To keep the border symmetrical, I am using my finger to brace against the edge of the handle, keeping the pencil stiff in my fingers.

The picture above will show a completed border on the handle of the spoon. For beginners, I recommend doing a smaller rectangle without a rounded top, as doing curves can be challenging for all skill levels.

With the border complete, I will use the same technique and draw the secondary border as shown in the photo above.

The border is now complete and ready for further design planning. The space in the middle will be for the basket weave, and as stated previously, for a beginner I recommend just having a rectangle this size or smaller for your design. I like to leave windows like this to give me more space to try new things in with kolrosing.

It’s time for the center line which will act as a guide for the grid pattern. I just eye it out and mark two lines for the straight edge to line up on. You can also use a ruler and measure properly to get something more exact. I do not feel this is necessary as eyeing it out is usually good enough.

Keep a pencil length thickness on the other side of your straight edge for drawing your center line. You can of course free hand this line, I do it all the time without any issues though it does take some practice.

The picture above will show the completed center line.

To begin the grid, create an arrow at the top of the line where the corner of the first square will be. This template makes it remarkably easy as it has a centerline for me to keep everything straight.

The spaces on the template make it easy to measure equal spaces however, you can use a ruler to keep consistency. You would simply make marks 2 cm apart down the center line.

You would then follow each mark on the center line and use a straightedge to draw your line, as shown in the picture above.

You can also use the corner of a business card to draw arrows as shown in the picture above.

The picture above will show how the template conveniently lines up. I am taking the arrows right down to the bottom of the line.

Once all the arrows are drawn, I use the straightedge to complete the line across to the other side and create the grid.

Always make sure to cross the centerline at the same point to keep the boxes the same consistent size.

The picture above will show the completed grid pattern which is now ready to map out the basket weave with.

I will now mark the dots as shown on the paper example, starting at the top center square, and then in a diamond pattern, 3 x 3 I will continue to mark dots across the entire grid. Try to mark even the small partial squares on the edges, as this will help to ensure you keep track of the pattern while kolrosing.

The final step is to mark the lines where the rectangles will go. I begin the first line in between the top left two squares and work my way down. Each rectangle is three squares, and they will always intersect to the middle of another rectangle as shown in the video above.
Kolrosing a Basket Weave on a Wooden Spoon
With the template completed it’s time to begin the knife work. Begin with the border on the top and bottom of the piece. Going across the woodgrain is different than going down the grain, the knife tip does not pass as easily.
A great trick for not going too far over any of your template lines, use your thumb on your non-dominant hand to keep everything steady. You can actually keep the thumb at the end of the lines you are kolrosing to use as a stopping point.
Once you go across the bottom and the top. Stick the tip of your knife into a corner and then firmly gripping your knife in your dominant hand, work your way down slowly. There is a temptation to do the entire line in one smooth motion, however, when kolrosing with the grain the knife will sometimes want to follow the woodgrain. Since the woodgrain will likely not match 100% with your pattern, taking each motion with the kolrosing knife slowly will help to ensure you don’t go outside of your template drawing.
Keep the thumb on your off hand braced at the end of the line to help you to stop and not go over. You can hold your off hand thumb on the knife with each pass of the kolrosing knife.

To grip the kolrosing knife (or sloyd knife), hold it like a pen and have almost the entire blade except for the very tip tightly pressed against your ring finger as shown in the picture above. You can use your pinky to brace against the table or spoon you are working on and this will help stabilize and guide you.
Keep the thumb on your off hand braced at the end of the line to help you to stop and not go over. You can hold your off hand thumb on the knife with each pass of the kolrosing knife.

The border is now complete. Curves can be tricky and as you can see in the photo, I didn’t 100% get it correct. This is completely fine. As the maker, you will usually be the only one who sees such imperfections. Also its good to keep in mind that as it is a handmade item, it will of course have many imperfections which all add to its charm and make it unique.
To kolrose a curve, start at the highest point and work your way down little by little. To complete the curve on the other side, turn your piece and knife around to go in the other direction, starting with the tip of your knife inside the previous cut at the very beginning. Go as light as possible to ensure a smooth curve as the deeper you go, the more stress it puts on the wood and can chip the surface.

Next we will begin on the basket weave, and start the lines for the rectangles, using the lines as a guide. An easy way to keep consistency is to do all the lines in one direction all the way across the template. Wiggle the spoon in the light because when the light is head on, you can see the pencil lines better but it makes it harder to see the kolrosing cuts. If you have the light at an angle, the light will cast small shadows in the kolrosing cuts and shine a glare on the pencil marks. This will help you to not miss any spots.

I will now switch up the grip of the spoon as shown in the photo above so that I can come in the opposite direction and do the other lines.

With all the lines completed, be sure to wiggle the pattern around in the light. It’s easy to miss spots. Getting the tiny spots closest to the border will make your design look super clean and consistent.

The weave is now complete. However, you can add a little more details at this point. To give the weave more of a realistic look I will now add small details as shown in the photo above.

The picture above will show the completed details on the weave.

The negative spaces can be left blank or you can use the tip of your knife to add small dots. I like to try different things on my various spoons. For the design above, I am adding lines across the squares on the middle ones, and then I will run lines down the squares on the left and right.

The picture above will show a complete basket weave, and I managed to make no mistakes that I am able to see.

The little windows will give me some space to try new things in. For the top window, I have drawn a little leaf design.

In the bottom window, I have put my maker’s mark - which is a rune of my own design that holds special meaning to me.
Finishing the Kolrosed Spoon with Oil, Pigment and Burnishing
We can now finish the spoon by applying a coat of finishing oil. I give especially generous applications to the bowl, the kolrosing design, and anywhere the end grain would be.

I then sprinkle some pigment on top of the spoon handle where the design is.

I then sprinkle some pigment on top of the spoon handle where the design is, just enough to cover it completely (the picture has more than enough, you can just rub little by little as needed).

Using one finger I will then rub the coffee into the design, left and right and in circles to ensure I cover it completely and get into every little kolrosing cut.

I will then wipe it down and clean up my working area a little bit.

Once it has been wiped, I like to rub more coffee into the design at least once more. This will really make the design nice and bold.

The last step is to burnish the design. This will seal the design into the wooden fibers permanently.
Admiring your Finished Spoon
The spoon is now complete! Take a final look at your work and admire the excellent work that you have done.

If you see any spots that you missed, simply fill them in with the kolrosing knife again and rub in more coffee. I cannot count the number of times where I forgot tiny spots.
No handmade item will be completely perfect and flawless. These imperfections will add to the beauty and charm that can only come from something that was made by a human with hours of care and attention.
A kolrosing design can be as simple or as complex as you want to make them, give this a try for yourself and you may find that you have found yourself a new life long passion.
A Complete Video Tutorial
I hope that this article was helpful and informative. Below you will find a complete video tutorial with all of the steps performed on a different wooden spoon.
Thank you for reading and happy kolrosing!